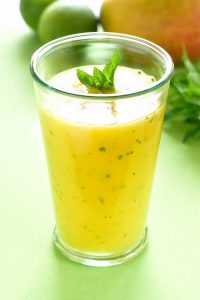
Summer is here in full swing and you can see people gathering at Lemon Juice stalls, Coconut water and Cucumber stalls to quench their thirst and also cool their bodies. It is very important to keep ourselves hydrated in order to avoid heat strokes. Aam Panna is one such cooler which helps in hydrating and also cooling our body.
Here is a recipe worth trying…
Ingredients:
3 Raw Mangoes
Rock salt
4 tbsps Jaggery
3 cups Water
1/2 tsp Roasted Cumin seeds powder
Few Mint leaves
Method:
Peel the raw mangoes and slice them into small pieces. Cook the slices in 3 cups of water. When the mango slices become soft, add the jaggery and switch off the flame after 2 minutes. The jaggery will dissolve in the hot mango solution. Now add rock salt, roasted cumin seeds powder and the mint leaves. Cool it by refrigeration. Add water and ice before serving. You can also add cardamom for flavour.
Enjoy this delicious drink and cool off the summer..:)
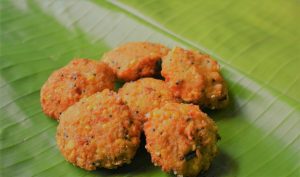
What do you make when you invite people for tea at your place? Thinking of making a snack for tea time always gets you into a chagrin – should it be a lavish tiffin or just namkeen ? Well, stop thinking and try this Mix Dal Vada which is a crispy protein rich snack, a big hit with the kids and am sure the guests too 🙂
Ingredients
Note: Please use a small cup, or you can even measure with a big serving spoon
1 cup Boiled Rice
1 cup Toor Dal
1 cup Moong Dal
1 cup Urad Dal
1 cup Chana Dal
1 tbsp chopped coconut
2 tsp whole pepper
4 -5 Red chillies
Curry leaves
Asafoetida
Salt acc to taste
Oil for frying
Method
Soak the boiled rice and all the dals together for an hour along with the red chillies. Drain the water and grind them into a coarse batter while adding salt. Now that the batter is ready, add freshly chopped coconut pieces, curry leaves,whole pepper and asafoetida to this. Mix well. Fry the vadas in oil and serve with any chutney or sauce of your choice.
The crunchy vadas with whole pieces of coconut and pepper make a good evening snack. I tried coriander chutney with this and it tasted great. You can add a twist to this recipe by giving a tadka (seasoning) of mustard seeds and hing(asafoetida) to the batter before frying.
Use Organic Dals and Cold Pressed Groundnut/Sunflower Oil for the best taste. You can find these ingredients on Amazon here
Ugadi, celebrated all over Telangana, Andhra Pradesh, Karnataka and Maharashtra, is festively observed as the first day of the Lunar Calendar.Among the few legends associated with Ugadi, there is one pertaining to Brahma that is widely popular. It is believed that Lord Brahma began creating the world on this day and Ugadi refers specifically to the Yuga in which the current generation lives i.e. the Kalyug. Ugadi also coincides with the onset of spring and the harvest season.
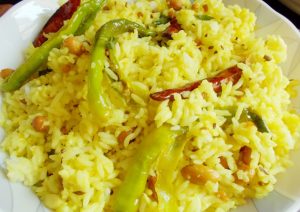
A variety of sweets and savories are prepared as part of a sumptuous feast across all states. In Telangana and Andhra, people love to add the Green Mango or Mamidikaya Pulihora to their delectable menu. This is a dish which requires no preparation and is pretty easy to make.
Here is a simple recipe for the same…
Ingredients:
2 cups Rice
1 cup grated green Mango
2 tsps Sesame Oil
1 tsp Chana dal
1/2 tsp Mustard seeds
1 tsp split Urad dal
1 pinch asafoetida
1 tsp Jeera
2 red chiiles
2 green chillies
curry leaves
1/4 tsp turmeric powder
Salt acc to taste
Roasted Cashews
Roasted peanuts
Preparation:
1.Heat the oil. Add Mustard seeds, Jeera, chana dal, Urad dal, green chillies, red chillies, hing and curry leaves. Roast them for one minute and then add the grated mango.Add a little salt to this.
2. Cook the rice separately in a pressure cooker
3. Once the mango is roasted, add the cooked rice. Mix well, add salt and turmeric to the mixture.
4. When the rice is well mixed with the mango, add the roasted peanuts and cashew.
5. Finally sprinkle fresh coriander leaves before serving
This pulihora takes very little preparation time and is a tangy favourite of many. It can be served with vadiyalu (fryums or papads) and a pachadi or any raita of your choice.
Rice, being such a staple Indian diet has so many variations one can think of. Just add a few veggies to it and it becomes a pulao, a biryani, khichdi, etc..the list can go on. A quick preparation is always welcome when we don’t have too many options.
Two capsicums were literally suffering to be let out of my refrigerator for almost a week. I was tired of making capsicum sambar or using capsicum in my North Indian dishes; the idea of making a simple recipe with capsicum took over.
Here is the recipe…
Ingredients:
2 Capsicums, finely chopped
1 cup Basmati Rice, soaked in water for half an hour
1-1/2 cups water
1 tsp Jeera
1 tsp grated ginger
1 split green chilli (you can add 2 if you want your rice to be spicy)
6-7 curry leaves
1-1/2 tbsp oil
1 tsp ghee
salt according to taste
Optional Seasoning:
2 tsps ghee
Cashews
Preparation:
1. Heat oil in a kadai, add jeera and let it crackle, now add grated ginger,green chilli and curry leaves.
2. Once these turn a little brown, add the capsicum and saute till the capsicum turns soft. Add little salt so the capsicum does not taste unsalted when the rice is added.
3. Strain water from the rice, and add it to the fried capsicum, add ghee and saute for about 2 minutes.
4. Now add water and required salt, cover the kadai completely and let the rice cook for atleast 10 minutes.
5. Check to see if the rice is cooked and there is no water left in the kadai. If you find the rice still a little uncooked, you can add some more water accordingly and cook.
6. Heat ghee in a seasoning spoon and add cashews. When the cashews turn a little brown, add it to the cooked rice.
The rice is done when you get a very nice aroma of capsicum mixed with ghee! You can serve this rice with a bowl of Raita and some papads.
This is a very quick recipe and can be made when you are bored and have nothing more interesting to cook at home.
Gujiya is a gujarati sweet dish that is synonymous with Holi and Diwali. It is like a sweet samosa. It keeps well, and hence can be made a couple of days ahead of time. We present to you a healthier version of the dish, without stepping too far from tradition. Enjoy, and wish you a very happy and colourful holi.
Ingredients:
1-1/2 cup dry fruits(almond,cashew,walnut)
1 cup desiccated coconut
⅓ cup jaggery
⅓ cup dates
½ tbsp poppy seeds
1 tbsp sooji or semolina
1 tsp elaichi or cardamom
2 tbsp water
2 cup atta
¼ cup sooji or semolina
A pinch of salt
2 tbsp oil
Warm water for kneading
1 tbsp aata with 1 tbsp water, for sealing
Oil for frying
Instructions:
Dry roast the dry fruits in a pan for 5-7 minutes.Keep it aside and let it cool.
Grind them into a coarse mixture.
Heat oil in a pan.
Add the shredded coconut.
Saute for 5 minutes on low flame and add the roughly chopped dates, jaggery and dry fruits. (Add some cashewnut paste to this if you want a deep rich taste)
Add semolina with 2 tbsp water.
Cook this mixture for 5 minutes on low flame and allow it to cool.
Knead the dough with flour, 2 tbsp oil ,semolina, water and salt.
Add extra flour as needed to keep from sticking to hands and board.
Place the dough in a greased vessel.
Cover with a cloth/plastic wrap for 15 minutes.
Take a small portion and roll it into small round ball. Roll it out and lay it on the inside of a gujiya mould (Grease the mould to make sure that the rolled dough doesn’t stick to it)
Add filling in the rolled pastry.
Seal the edges with flour and water mix.
Brush the gujiya with oil and bake for 10 minutes@160 degree Centigrade.
Heat oil in a small & deep kadai.
Once the oil is hot, add half-baked gujiya to it.
Cook on low flame for 10 minutes or until golden brown. (or skip #15-17 and deep fry the traditional way)
Winter is on its way out in most parts of the country and the ‘now warm-now cold’ weather is giving many of us the sniffles. You pack away the warm blankets one day, only to pull them out the next. The first to be attacked by the flu are those with low body immunity. It is at times like these that we wish our immunity was higher and our body constitution stronger to weather the seasonal changes.
Your grandparents and other family elders would have probably told you that they were much healthier than you even though they didn’t have such a variety of things to eat. Hearts of hearts we have envied them and wondered about the secret of their good health.
There are many ways to boost the body immunity – exposure to sunlight, regular intake of greens, fruits, vegetables, onion, ginger, garlic, probiotics and fermented foods. Consuming cold pressed oils is also one way to boost your body immunity. Your grandparents will vouch for this one, but the term cold pressed wasn’t around when they were young.
Cold pressed oils give us immune benefiting components, antioxidants and substances that trigger the healing process.
So, how can we slip in cold pressed oils in our diet regimes? Here are a few suggestions:
Hot soups are welcome when you have the sniffles. Add teaspoon of cold pressed oil to stir fry the veggies that go into the soup. It will give your soup some texture and also make it healthier.
Salad dressings are another super easy way you can add cold pressed oils to your diet. There are many delicious salad dressings that are best made at home. Choose one that suits the taste buds of your family and toss up a tasty salad.
Homemade mayonnaise is another way you can use cold pressed oils. Flavourful and creamy mayonnaise can be had with sandwiches and salads.
Make peanut butter at home. Add a tablespoonful of cold pressed groundnut oil for extra creamy smoothness to the peanut butter.
And the best way to use cold pressed oils I would say, is to have nalla kharam or molaga podi or gun powder as it is popularly called, with hot rice. Normally we use ghee with our molaga podi, but you can take half ghee and half cold pressed oil. Heat it in a pan, add some mustard seeds and asafoetida. When the mustard splutters, drizzle this ghee-oil mix on the hot rice. Sprinkle a tablespoonful of molaga podi, mix it and enjoy. Out with the sniffles!
When we are healthy and well rested, we feel better and do better. We are also kinder, smarter and more productive. So eat healthy and live better!
Sujata C
Daana cold pressed oils are organic and procured from small and marginal farmers. Daana Blog is produced by Daana Farmers Network to promote understanding about Naturally grown, Organic food. Support us by buying your grains, oils and staples from our farmers through Amazon, Bigbasket or directly from Daana.in.
There are two must-dos for any visitor who comes to Hyderabad – eat biryani and buy pearls. The funny thing is both these items don’t originate here. Hyderabad is not on the sea coast and pearls are not natively found here and despite a 400 year old association with Hyderabad, biryani did not originate here.
If you were to plot a route for biryani, you will need the map of Asia, for that is what it is – an Asian dish popular in its varied forms. It is probably the only single pot dish that has travelled from region to region devouring boundaries on its way and picking up the flavours of the places it passed.
Biryani is known to have been brought to India by Taimur-e Lang, the lame but fierce Mongol ruler who invaded India towards the end of the Tughlaq dynasty. It is very interesting to track the spread of biryani in India. The dish took on the flavours and and aromas peculiar to each region and evolved into a variety of region specific biryanis – the Kashmiri, the Awadhi or Lucknowi, the Malabari, the Arcot biryani, Calicut biryani and the Hyderabadi biryani, each unique and delicious in its own way.
Dig into history: People say biryani was the Nizam’s gift of love to Hyderabad, but the history of the Hyderabadi biryani predates the Nizams. Legend has it that Mumtaz Mahal, wife of Shah Jahan and mother of Aurangzeb, cooked up the recipe of this meat and rice dish to quell the hunger pangs of marching soldiers who had to walk long distances.
It is possible that Aurangzeb brought the biryani to Hyderabad along with him when he came down to conquer the Deccan and his army laid siege for nine months camping in the Fateh Maidan to conquer the Golconda Fort.
Yet another piece of history says that the nomads of West Asia came up with this dish. They would mix rice, meat and spices in a pot and bury it in the sand. Cooked by the heat of the sun, the biryani would be ready when the pot was dug up after a few hours. Sounds incredible, doesn’t it!
We talked about pot cooking in our last post. We take it forward here with this recipe for a chicken pot biryani. Try it out one evening and look out for the compliments!
Sujata C
You don’t need basmati rice for this recipe. Use Organic Sona masuri Rice and Cold Pressed Groundnut Oil for the best taste.
Tomorrow we celebrate Ganesha Chaturthi. Ganesha is considered the remover of obstacles and is typically prostrated to / worshipped first before any other task is taken upon (and that includes the pooja or worshipping of other deities as well.)
The archetype of Ganesha features a young plump lad, with an elephants head. He is unhurried in his gait, relaxed in his nature, and loves to eat all sorts of food. His favourite food (esp in the south of India) is a sweet steamed rice dumpling called the Kozhakattai in Tamil (Modak in Marathi).
The recipe below is a healthier version of the already healthy dish. This recipe uses brown rice flour.
To make the brown rice flour:
Soak brown rice (2 cups) in warm water for a few hours until it is well soaked
Drain all the water out and let it dry outside (but not under direct sun) for a few hours till all the surface dampness is gone.
Dry grind the rice in a blender to yield a fine powder.
To make the kozhakattai:
Ingredients:
1 cup fine brown rice flour
1 tsp sesame oil
Salt
1/2 cup grated coconut
1/2 cup grated jaggery
A pinch of cardamom powder
Method:
In a thick bottomed skillet, add the grated jaggery and coconut, stir on a low flame till they are incorporated into a nice gooey mixture. Turn off the flame, and add the pinch of cardamom powder to it and mix well. Set aside to cool
In another skillet, pour 1 cup water, a pinch of salt and a teaspoon of oil and let the water boil. When it begins to boil, turn it off, pour the brown rice flour into it as a heap, and close it with a lid.
Few minutes later, open the lid, the flour must have nicely absorbed the warm water into it and must be pliable like dough.
Grease your fingertips with some oil and make a small ball of dough, start flattening it from the tips till you have formed a nice wide cup with the dough.
Fill a teaspoon of the coconut jaggery filling (called the poornam). You can see a video of how to do it in this link: Kozhakattai Dumpling
Make the whole lot of it and place it in a steamer and steam the dumplings for 5 to 7 minutes. (You will get an amazing fragrance of steamed rice)
Cool and serve.
As always, would love to hear from you. Do try it out and let me know how it came. Wish you and your loved ones a very happy Ganesha Chaturthi.
When I eat at a restaurant, I oftentimes wonder if I can replicate the same dish at home: keep the richness of the flavour, but cut out that cloyingly heavy feeling you get by eating that cream-and-butter-laden restaurant dish.
If you’re like me, you will like this recipe for Dal Makhani, which I made yesterday. “Makhan” refers to homemade white butter. This recipe contains no butter, but tastes just as good.
Ingredients: (all measurements are approximate. Feel free to add or subtract to suit your discretion)
One cup whole masoor dal (also known as whole red lentil. If you live outside the Indian subcontinent, you will find it in any Indian or middle eastern grocery store)
Half cup rajma (red kidney bean)
One onion, finely chopped
Few garlic cloves, finely chopped
2 green chillies, sliced lengthwise
3 tomatoes, finely chopped
One fistful of cashew nuts
Spices: Salt, dhania (Coriander) powder, jeera (Cumin) powder, haldi (turmeric) powder and optionally some pounded cinnamon, elaichi (cardamom). If you want it light on spices, skip the cinnamon and elaichi.
Method:
Soak the rajma in warm water for a hour. Soak the cashews in warm water separately for an hour.
Cook the masoor dal and rajma in a cooker and ensure they are well cooked, but not too gooey. Mash them with a hand masher so you can still see pieces of the lentil, but they’re soft and mixed together
In a kadai (wide saute pan), heat some groundnut oil, add the onions, garlic, green chillies. Saute until the onions are lightly brown, then add the tomatoes; reduce the flame, put a lid on and cook until the tomatoes turn soft
Now add the mashed dal, salt and other spices and let it simmer a few minutes. (I prefer to add the spices at this time, and not while sauteing the onions as this preserves their flavour and aroma)
Grind the soaked cashews into a fine, slightly runny paste. Add most of it into the dal and mix it up.
Pour into a bowl to serve, drizzle the rest of the cashew paste on top, add a few sprigs of coriander leaves to garnish.
Eat with hot rotis
This is an amazing comfort food during the rainy season. If there is any of it left over, just warm it up and eat it as a snack. Do try it out and let me know how it was.

 Gujiya is a gujarati sweet dish that is synonymous with Holi and Diwali. It is like a sweet samosa. It keeps well, and hence can be made a couple of days ahead of time. We present to you a healthier version of the dish, without stepping too far from tradition. Enjoy, and wish you a very happy and colourful holi.